
How to Inspect RO Tubing for Kinks and Flow Restrictions
A careful RO tubing inspection can reveal a pinched line or tight bend that slows water production. It can also help distinguish a tubing problem from a clogged filter, a valve issue, or another fault.
Start with a visual check, then isolate and depressurize the system before touching or disconnecting tubing. Since reverse osmosis systems vary, follow the manufacturer's instructions whenever the inspection goes beyond looking at accessible lines.
Key Takeaways
- Look for flattened tubing, sharp bends, pinches, leaks, and strained connections.
- Trace each accessible tube between its components, including drain tubing.
- Don't force a bend, pull on a line, or disconnect a fitting to test it.
- Shut off water and relieve pressure before loosening or removing any component.
- Low flow can come from other parts of the system, so don't assume tubing is the cause.
Why RO tubing can restrict flow
RO tubing carries water between treatment stages, storage, and the faucet. If a section is compressed or bent too tightly, water may have trouble moving through it. A restriction can affect production or delivery, depending on the tube's place in the system.
A low-flow symptom doesn't prove that tubing is blocked. A clogged prefilter can reduce flow to the membrane, while a membrane or valve problem can also affect performance. In a whole-house system, several treatment stages may contribute to pressure loss.
A visual check is useful because it can reveal obvious damage or poor routing. However, some restrictions sit inside fittings or equipment and won't be visible from the outside.
Prepare safely before inspecting
Decide whether you need to shut down the system
For a visual inspection, you can look at accessible tubing without moving it or opening any components. If you plan to touch, reposition, or disconnect a line, shut off the feed-water supply using the system's designated isolation valve.
Turn off the booster pump, UV unit, controller, or other powered component when the manufacturer's procedure calls for it. Use the manual for hardwired equipment. Don't turn unfamiliar valves or switches just to see what they do.
Relieve pressure before loosening anything
Before opening a housing or loosening tubing or fittings, use the approved faucet or service point to relieve pressure. Wait for flow to stop, then drain the system as its instructions specify. Pressurized housings and lines can release water suddenly.
Some systems also require draining the storage tank or other vessels. The correct sequence depends on the equipment, so stop if you can't identify the right isolation or drain points. Never pull a tube from a fitting while the system remains pressurized.
Spot visible kinks and tight bends
Trace the tubing without pulling it
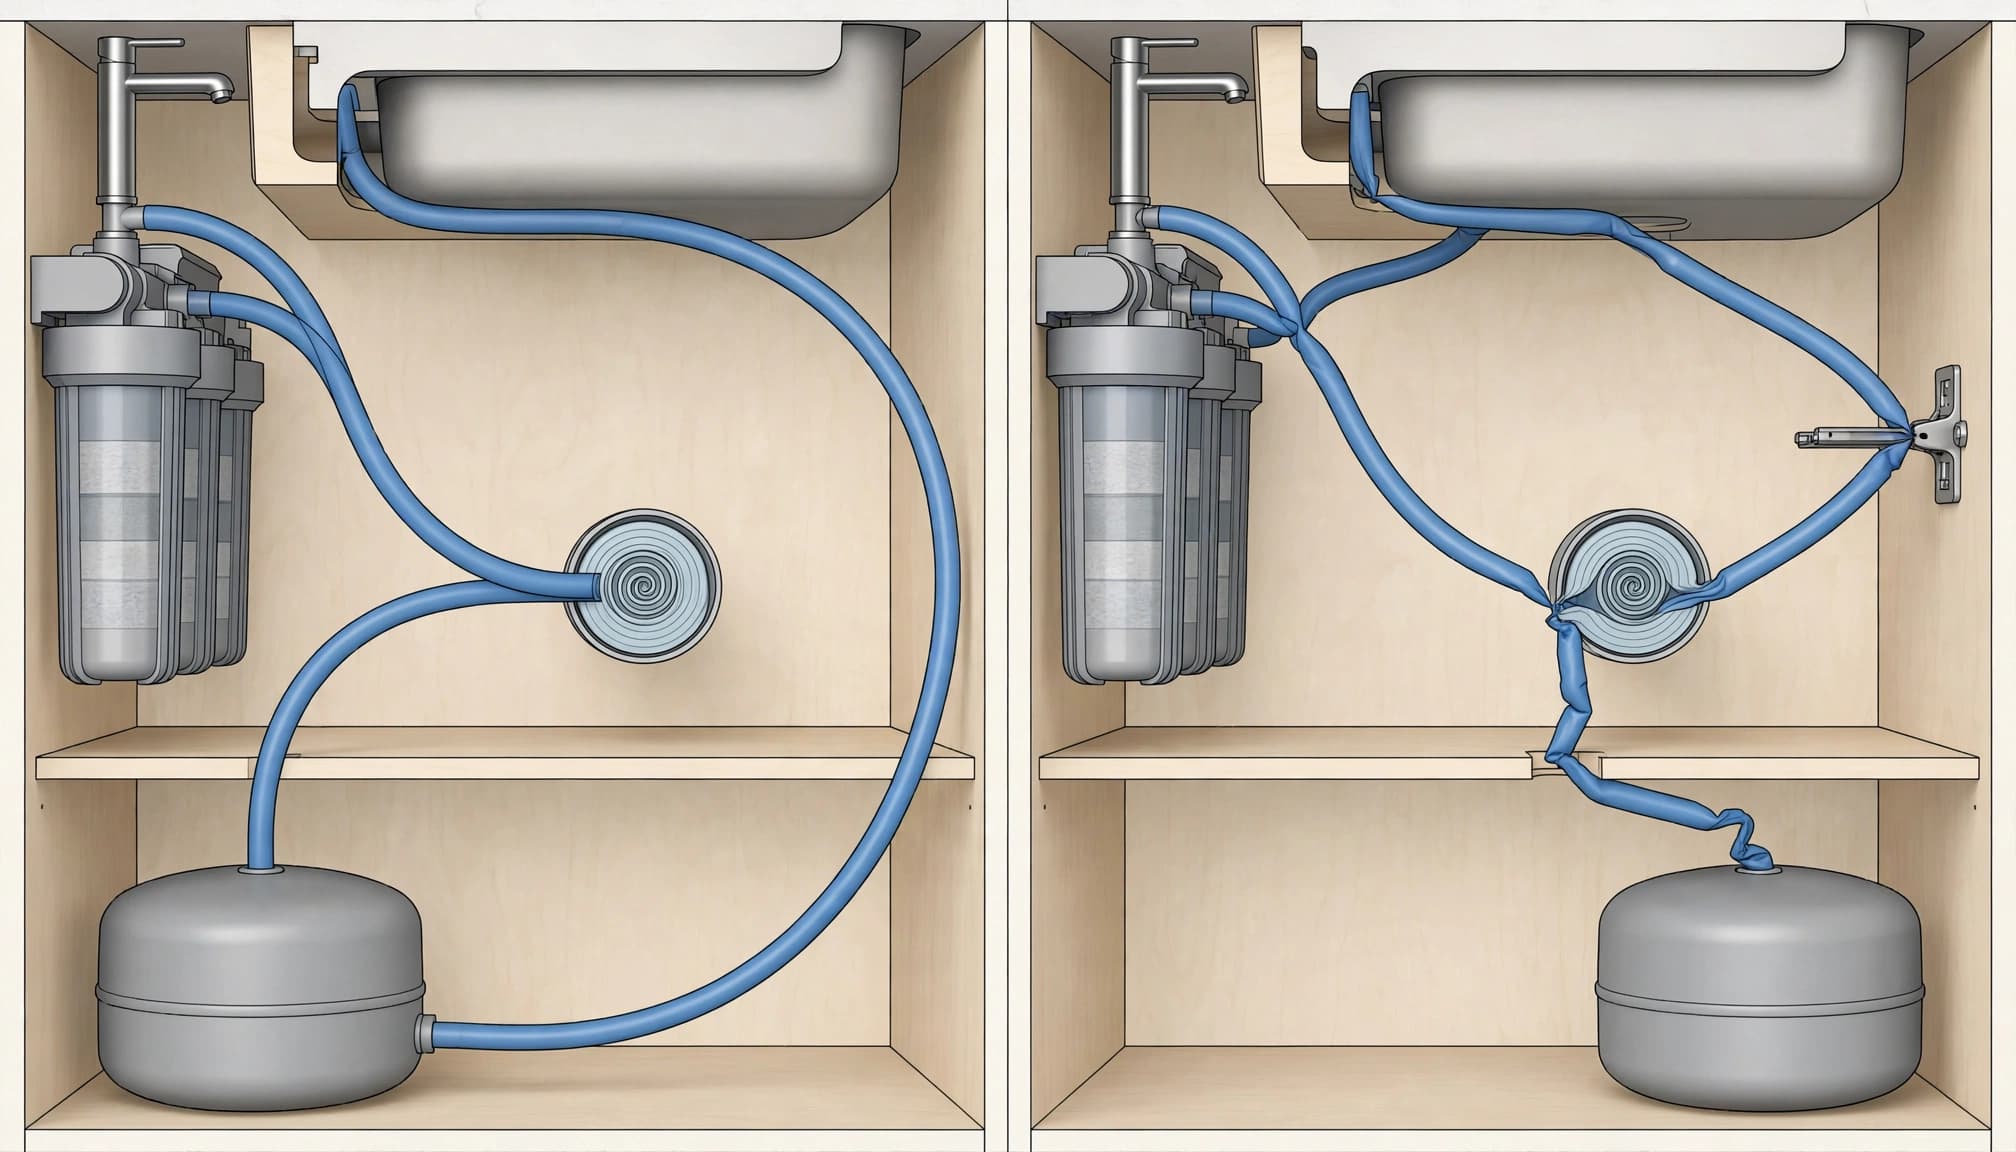
Follow each accessible tube from one connection to the next. Look for a sharp change in direction, a crushed section, or a line trapped between the cabinet wall, stored items, or a tank. A tube can look fine near the filters but become pinched behind equipment.
A normal curve should retain its shape rather than flatten at the bend. Don't force tubing into a wider curve or tug it free from a cramped space. If the line resists movement, leave it in place until you can follow the manufacturer's procedure.
Look for physical damage
Check accessible tubing for flattened spots, cuts, cracks, unusual discoloration, or moisture. A damp connection may point to a leak rather than a flow restriction, but both need attention. Mineral deposits around a fitting can also indicate a past or ongoing leak.
Pay close attention where tubing passes through a cabinet opening or sits close to an edge. Contact with a sharp or tight opening can leave a mark or compress the line. Don't cover damaged tubing with tape or try an unapproved repair.
Check fittings and tubing routes
Inspect connection points
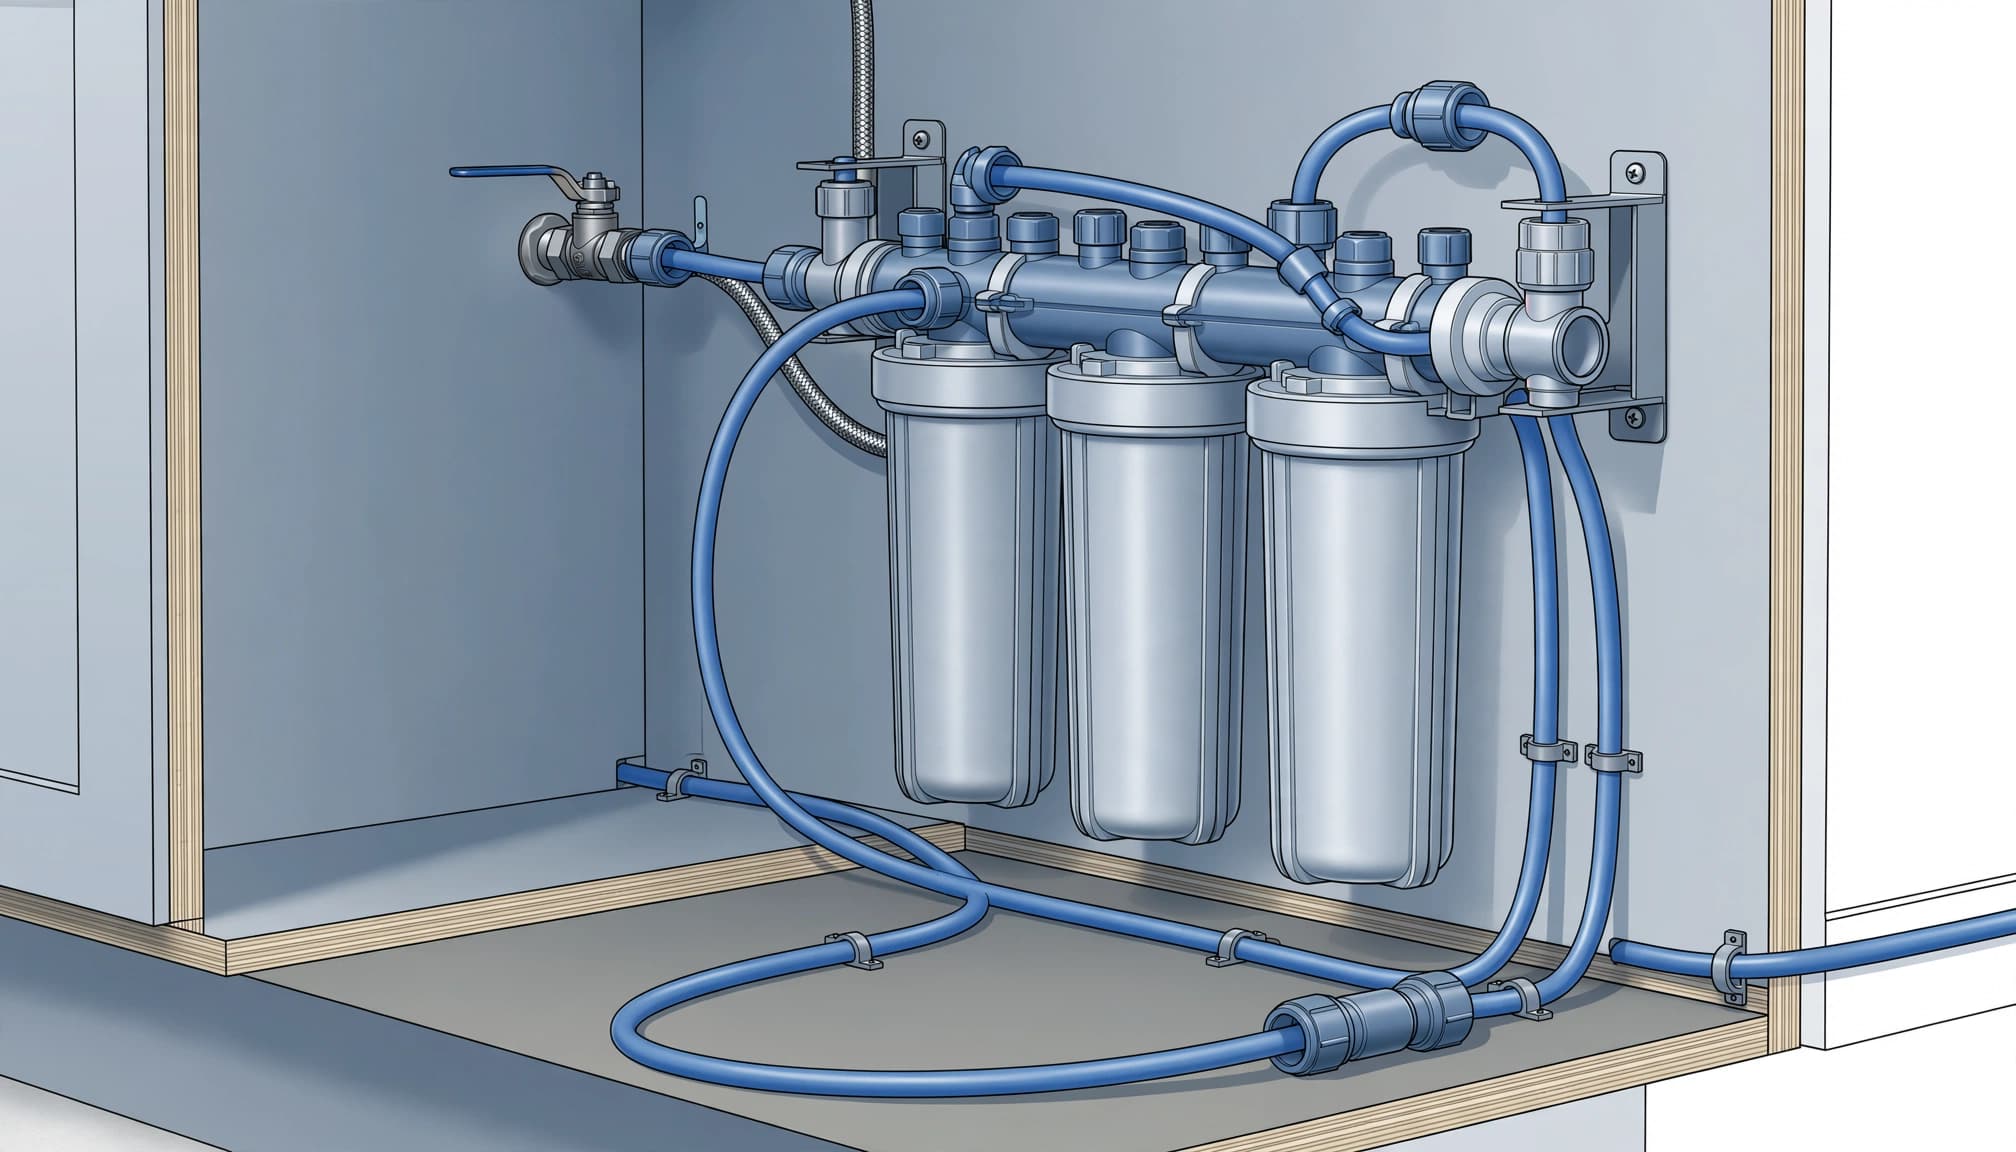
Look at each accessible fitting where tubing enters a filter housing, manifold, tank, or faucet. The line should appear aligned, without visible strain or a pronounced angle right at the connection. Check for dampness, cracks, or buildup around the fitting.
A fitting can be restricted internally even when the outside looks normal. Don't push a wire or tool into it, and don't remove a fitting to inspect it unless the manual gives that procedure. If a connection appears loose or damaged, shut off the water and relieve pressure before any service.
Follow the route through the whole system
Trace the product-water line toward the storage tank or faucet, as well as the drain line where accessible. Look for excess slack that has folded over, a tube trapped behind a tank, or a route that puts pressure on a fitting.
Use the system diagram to identify each line and port. Connections can serve different purposes, and swapping or rerouting them without the model's instructions can create new problems. For broader upkeep, see our guide to maintenance needs of RO and nanofiltration systems.
Look for less obvious restrictions
Consider a pinched section or blocked fitting
A tube may be partially compressed without forming an obvious, sharp kink. Inspect places where the line passes behind equipment or through a narrow opening. If flow is weak and no outside damage is visible, a restriction inside a fitting or valve is possible, but a visual inspection alone can't confirm it.
Avoid squeezing the tube, blowing through it, or using chemicals to clear a suspected blockage. Those methods can damage components or introduce contamination. Follow the manufacturer's service steps or have a qualified water-treatment professional diagnose the line.
Check for routing problems beyond the tubing
A restricted drain route can affect RO operation too. Inspect accessible drain tubing for a pinch, tight bend, or trapped section, but don't alter the drain connection or faucet assembly without the system diagram. A slow sink drain may also affect discharge from the RO unit.
Keep in mind that restrictions elsewhere can produce similar symptoms. A sediment filter can limit flow to the membrane when clogged, and a partially closed valve can reduce supply. That's why it helps to inspect the entire system rather than focus on a single tube.
Determine whether tubing is causing low flow
Compare what you observe with the symptom
Note which faucet or outlet has weak flow and whether the system produces water more slowly than usual. If a single fixture is affected, its local faucet or plumbing may be involved. If the RO faucet and production both seem slow, check for visible restrictions along the RO route, then consider filters, valves, and the membrane.
A full storage tank can change flow behavior at a point-of-use faucet, while a tank that takes unusually long to refill may suggest a production issue. Don't use a single symptom to diagnose a specific component.
Keep a simple record
Write down the location of any pinch, damp fitting, or damaged line, along with changes in flow or unusual sounds. If you have system pressure readings, record them without trying to adjust the system. A technician can use those observations alongside operating pressure and flow checks.
A troubleshooting guide for whole-house RO system issues can help you recognize when several symptoms point to a broader service problem.
When to stop and arrange service
Stop the inspection if you find cracked tubing, an active leak, a damaged housing, or an electrical issue. Shut off the feed water if you can identify the correct valve safely. If you can't identify the valve or depressurize the system, don't loosen any parts.
Professional service is also appropriate when tubing looks intact but flow remains low, when a fitting may be clogged, or when the system's valve positions and routes are unclear. A technician can check tubing alongside the filters, membrane, pressure, and controls instead of replacing parts by guesswork.
FAQ
Can I inspect RO tubing while the system is running?
You can visually inspect accessible tubing without touching it. Shut off water and follow the system's depressurization procedure before moving or disconnecting any line.
Should I bend tubing to see whether it is blocked?
No. Forcing a bend or squeezing a tube can damage it. Look for visible flattening and follow the manufacturer's instructions if the line needs adjustment.
Can a clean-looking tube still restrict flow?
Yes. A restriction inside a fitting or another component may not be visible externally. Low flow can also come from a clogged prefilter, valve, or membrane.
Should I replace tubing if it has a kink?
Don't decide based on appearance alone or attempt an unverified repair. Isolate and depressurize the system, then use the manufacturer's replacement procedure or arrange service.
A careful inspection prevents guesswork
Look for visible pinches, tight bends, damage, and strained connections before concluding that tubing is the cause of low flow. If the issue isn't clear, leave the system intact and get help diagnosing the full water path.
A safe inspection starts with the system's own instructions. Follow them before touching fittings or opening equipment.
Latest posts
Read Our Blog
Tips, guides, industry best practices, and news.

Contact us
Get in touch
Our friendly team is ready to chat.
